Install
- Download the installer from the download page, unzip it and run it.
- Choose to install for every user or just for you (no admin rights needed).
- Leave Open .fbx and .obj in Asset Inspector ticked if you want a double-click in Explorer to open the light viewer.
The first start shows a short splash and opens the editor. Your projects, history and settings live in %APPDATA%, so updates never touch them.
- Завантажте інсталятор зі сторінки завантаження, розпакуйте й запустіть.
- Оберіть установку для всіх користувачів або лише для себе (без прав адміністратора).
- Лишіть галочку Відкривати .fbx і .obj в Asset Inspector, якщо хочете, щоб подвійний клік у Провіднику відкривав легкий переглядач.
Під час першого запуску показується короткий сплеш, далі відкривається редактор. Ваші проєкти, історія та налаштування зберігаються в %APPDATA%, тож оновлення їх не чіпають.
The first scan
- Drag an FBX or OBJ into the window, or press Ctrl+O. Several files at once go into one scene.
- Pick the project of the client at the top of the right panel - the scan checks against its rules.
- Press Scan (or Ctrl+R). Tick Fast to skip the heavy checks when you only need a quick look.
- Перетягніть FBX або OBJ у вікно чи натисніть Ctrl+O. Кілька файлів одразу потрапляють в одну сцену.
- Оберіть проєкт клієнта вгорі правої панелі - сканер перевіряє за його правилами.
- Натисніть Scan (або Ctrl+R). Галочка Fast пропускає важкі перевірки, коли треба лише глянути.
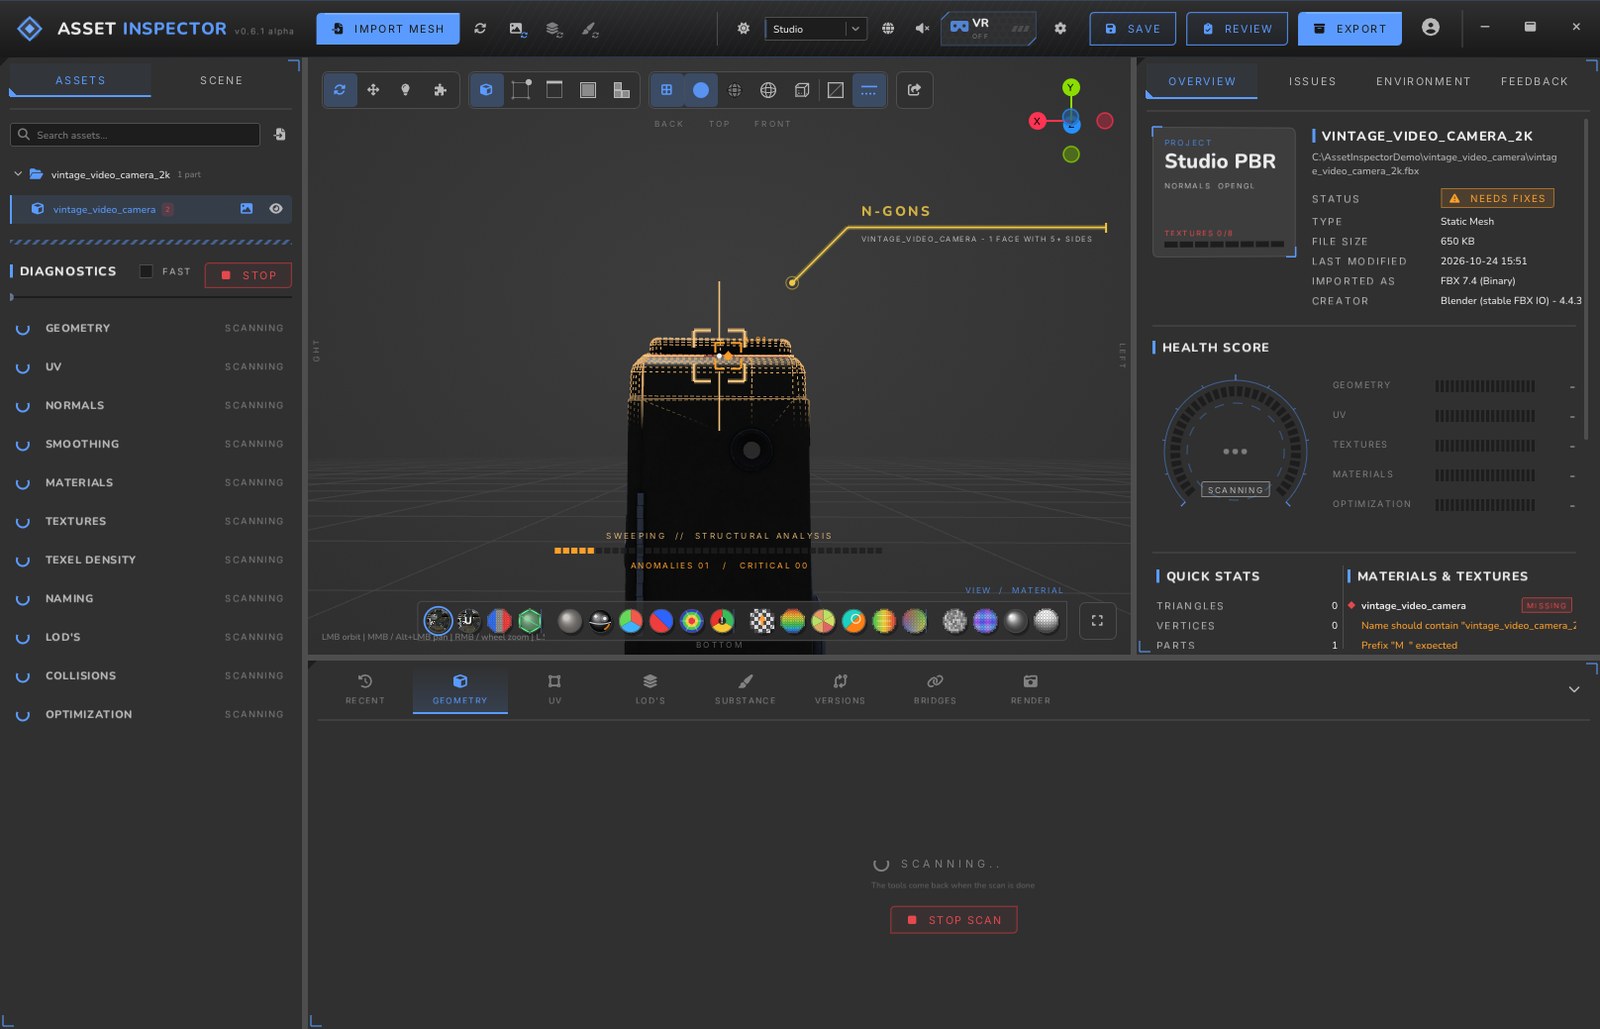
Reading the report
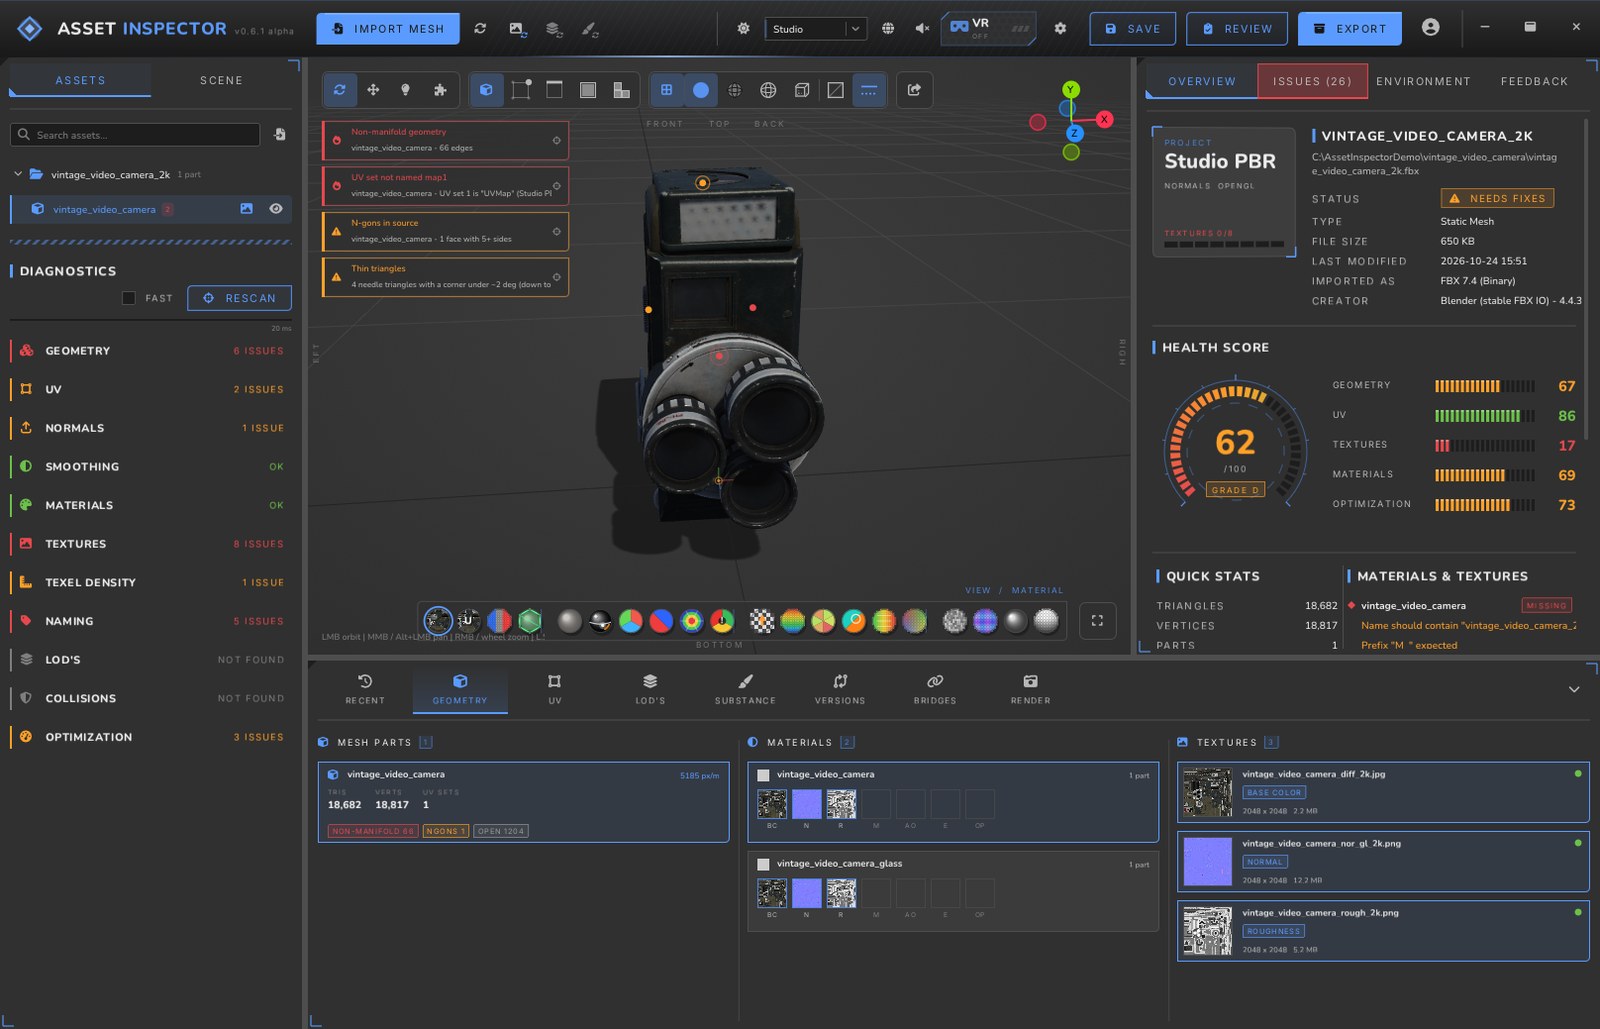
When the scan ends you get a health score out of 100 with a grade, and a score per category. On the left, the eleven groups show how many problems each found.
- Red - errors that break the asset in the engine or for the client (non-manifold geometry, missing maps, a UV set with the wrong name).
- Orange - warnings worth a look (thin triangles, tight UV padding, texel density off target).
- Click a finding: the camera flies to it and the faces light up. Its list of elements (edge chains, islands, faces) steps through every occurrence.
- Ctrl+E exports the report to an HTML file you can attach to the delivery.
Після сканування ви бачите оцінку якості зі 100 з літерою і оцінку за кожною категорією. Ліворуч одинадцять груп показують, скільки проблем знайшла кожна.
- Червоні - помилки, через які асет зламається в рушії чи не пройде клієнта (non-manifold геометрія, відсутні карти, UV-сет з неправильною назвою).
- Помаранчеві - попередження, на які варто глянути (тонкі трикутники, малий UV-падінг, щільність текселів поза ціллю).
- Клацніть знахідку - камера летить до неї, полігони підсвічуються. Список елементів (ланцюжки ребер, острови, полігони) дає пройти по кожному випадку.
- Ctrl+E експортує звіт у HTML-файл, який можна прикласти до здачі.
Projects & rules
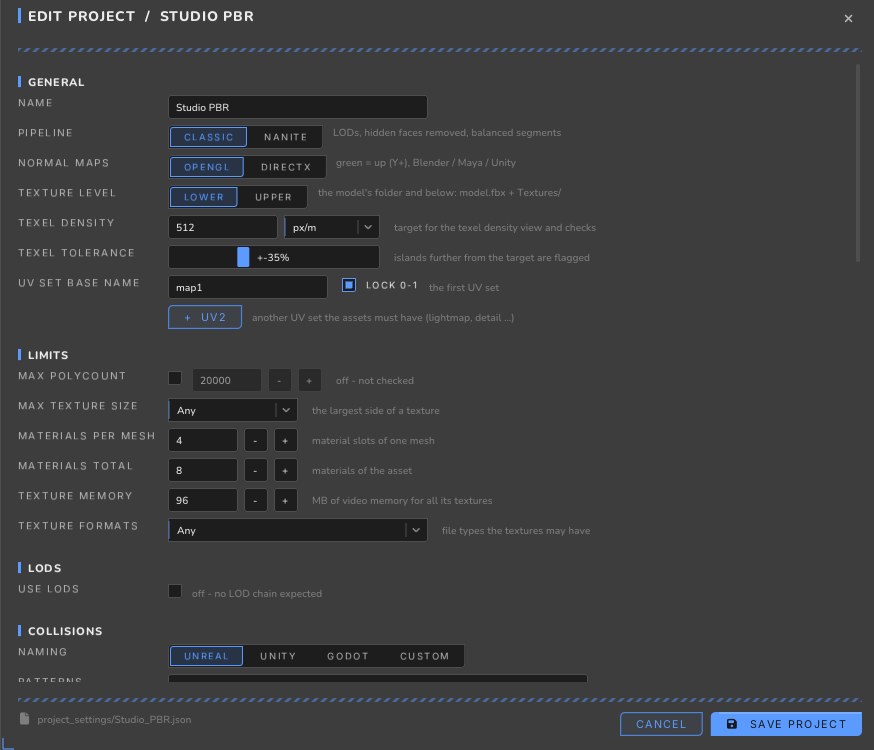
A project holds what "done" means for one client. Create one in the project menu and set:
- Texture slots and their naming - which maps a material must have and what they are called.
- Normal maps OpenGL or DirectX, the texel density target and tolerance, the name of the first UV set.
- Limits: max polycount, texture size and formats.
- LODs (expected or not) and collision naming - Unreal, Unity, Godot or your own patterns.
Projects are plain JSON files - share them with the team to check everyone's work the same way.
Проєкт зберігає, що означає «готово» для одного клієнта. Створіть його в меню проєктів і задайте:
- Текстурні слоти та їхній неймінг - які карти має мати матеріал і як вони називаються.
- Нормалі OpenGL чи DirectX, ціль і допуск щільності текселів, назву першого UV-сету.
- Ліміти: максимум полігонів, розмір і формати текстур.
- LOD-и (очікуються чи ні) та неймінг колізій - Unreal, Unity, Godot або свої шаблони.
Проєкти - звичайні JSON-файли: поділіться ними з командою, щоб перевіряти роботу всіх однаково.
UV editor
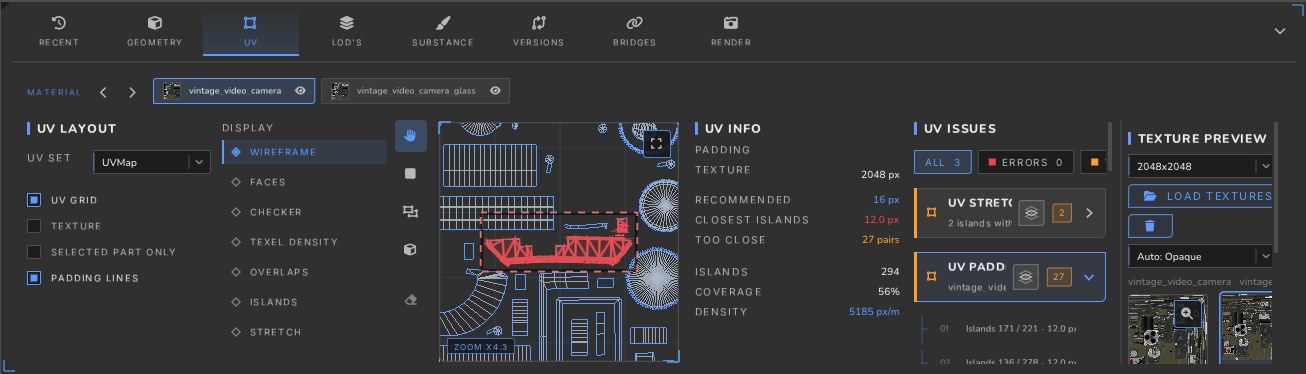
The UV Editor tab at the bottom shows the layout of the selected material over its texture: wireframe, faces, checker, texel density, overlaps, islands. UV findings appear beside it; picking one frames its islands.
Put the cursor over a texture and press Tab to open it full screen, with every texture of the asset listed on the right.
Вкладка UV Editor унизу показує розкладку обраного матеріалу поверх його текстури: сітку, полігони, чекер, щільність текселів, накладання, острови. UV-знахідки - поруч; вибір знахідки показує її острови.
Наведіть курсор на текстуру й натисніть Tab, щоб відкрити її на весь екран зі списком усіх текстур асета праворуч.
LODs & collisions
In the LOD's tab load the chain from one FBX, from several files (up to 7 custom slots, several files per slot) or from a Maya scene. Each level shows its triangles and the drop from the one before; Show all lays the objects out in columns and the LODs in rows. Collision meshes are found by the naming set in the project.
У вкладці LOD's завантажте ланцюжок з одного FBX, з кількох файлів (до 7 власних слотів, кілька файлів на слот) або зі сцени Maya. Кожен рівень показує трикутники і скорочення від попереднього; Show all розкладає об'єкти в колонки, а LOD-и в рядки. Колізійні меші знаходяться за неймінгом, заданим у проєкті.
Render sheets
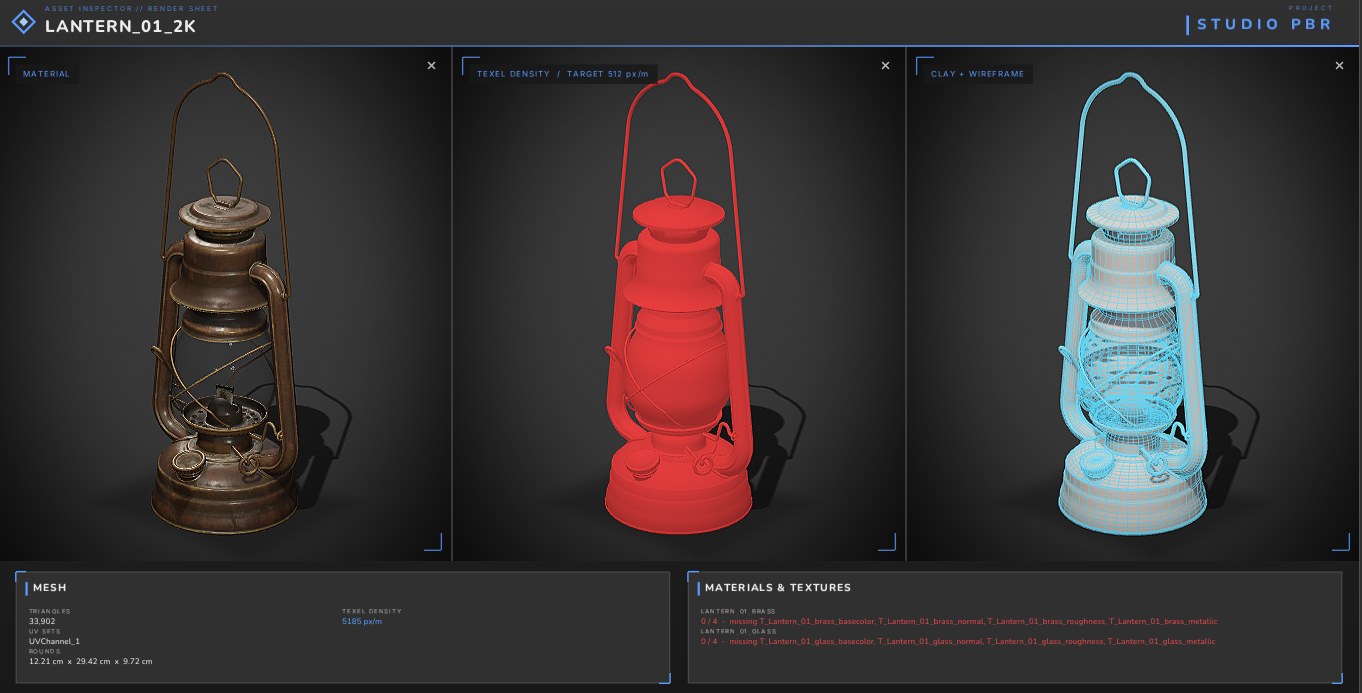
The Render tab makes single renders (F9) and sheets (Shift+F9). In the preview pick the views - material, texel density, clay with wireframe, LODs - drag any view to turn them all, choose the background, wireframe color and watermark.
Вкладка Render робить окремі рендери (F9) і листи (Shift+F9). У превʼю оберіть види - матеріал, щільність текселів, клей із сіткою, LOD-и, - потягніть будь-який вид, щоб повернути всі, оберіть фон, колір сітки й вотермарк.
Bridges
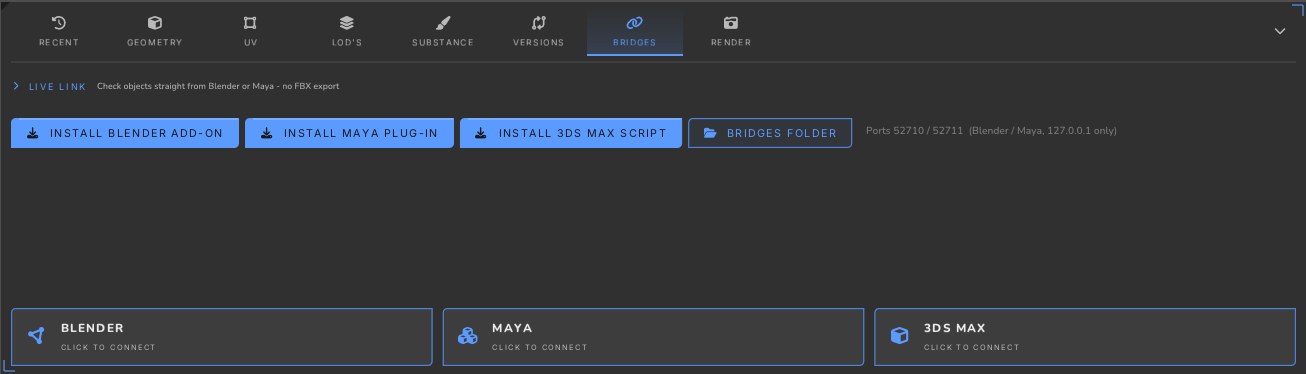
- Open the Bridges tab and install the add-on for Blender, the plug-in for Maya or the script for 3ds Max (once).
- Restart the 3D app. In Blender the link is in the Sidebar > Asset Inspector; in Maya - the Asset Inspector menu.
- Press the app's card in Asset Inspector, pick collections, groups or objects and press Pull.
- Відкрийте вкладку Bridges і встановіть аддон для Blender, плагін для Maya або скрипт для 3ds Max (один раз).
- Перезапустіть 3D-програму. У Blender зв'язок - у Sidebar > Asset Inspector; у Maya - меню Asset Inspector.
- Натисніть картку програми в Asset Inspector, оберіть колекції, групи чи об'єкти й натисніть Pull.
Hotkeys
Every shortcut can be changed in Settings (Ctrl + ,).
| Import mesh | Ctrl O |
| Run the scan | Ctrl R |
| Export report | Ctrl E |
| Save | Ctrl S |
| Feedback (select a region) | Ctrl F |
| Frame the model / the selected part | F · Shift F |
| Full screen: the panel under the cursor | Tab |
| Switch versions | Shift Tab |
| Solid / solid + wire / wire / x-ray | Alt 1–4 |
| Select vertices / edges / faces / objects / elements | 1–5 |
| Isolate the picked objects | Alt Q |
| Grid / bounding box / proportions | G · B · P |
| Perspective / orthographic | O |
| Render single / sheet | F9 · Shift F9 |
| Save screenshot | F12 |
| Fullscreen viewport | F11 |